Now that we have basic access to the ASA, we'll continue on with the configurations through ASDM. From reading the study material and the exam blueprints, it looks like you are expected to know how to configure basic access lists, NAT, PAT, and some setup through ASDM. So in this lab, we'll cover exactly that.
Assuming you followed the first part of the lab, you should be able to reach the ASA at https://172.16.100.1
Since you restricted management access only from 172.16.100.10, your PC will need this address.
Either run ASDM by downloading it locally and running it, or by using the java web start option. Since I was battling some java issues at the time, I used the java web start app. (You can click on these images to expand them)

Now that we have entered ASDM, it's time to perform some basic configurations.
Review Firewall Configuration
Lets start by reviewing our CLI commands, and seeing what that looks like within ASDM (you should know how to configure that here as well). We'll look at our interfaces, security levels, and associated VLANs. Click on the configuration tab, and then on the panel on the left, click on interfaces.

Here we can see the interface names on the first column. The first row has no name, as these interfaces are all assigned to VLAN 1 by default (we didn't set them up-eth0/1 was reserved for the DMZ, and none of the others were configured). The switchports will be shut down by default. We will go ahead and disable this interface for now.
Click edit, which brings up this window.

You can see that eth0/1, and eth 0/3-7 are assigned to this interface (VLAN 1). You should be able to see from here how you would configure this if you had just setup the ASA with a barebones configuration for accessing it via ASDM-an IP address assigned to VLAN 1, an ifname, and bringing up say eth0/0 or whichever switchport you wanted to use for the inside. Then within ASDM, you could configure your other interfaces (SVIs for those of us with the 5505), assign the name, security level, and assign switchports. If you were to create a new interface, you could set its VLAN ID under the advanced tab.
A special note for the ASDM-generally speaking, when you configure something within an edit window, it will not apply this configuration to the running-config until you click the Apply button at the bottom of the window. If you click the Save tab on the menu bar (with home, configuration, monitoring, etc), it will backup the running config to startup config.
Now, select the Switch Ports tab.

Here you can verify the configuration we implemented with the CLI- switchports 0/0 and 0/2 are up. 0/0 is assigned to interface VLAN 10 (outside), and 0/2 is assigned to VLAN 100 (inside). All other interfaces are set to their default configurations of VLAN 1, disabled.
I have the basic ASA license, so I am unable to fully configure a DMZ at this point in time, so lets move on to configuring our static routes.
Configure Routing
If we want our traffic to go anywhere, we will need to set some default routes for the ASA. Lets get to the routing configuration tab by clicking on Device Setup>Routing>Static Routes

We have an empty table-we need to configure some routes. Now according to our overall topology, we have our corp border router connected to our ASA. (not setup yet, but will be in the next lab). The interface facing us is on the 207.100.100.0/27 block, with IP address 207.100.100.30. We will configure a default route to that gateway IP address. With our simple configuration, the ASA will know to send traffic addressed to the inside address range of 172.16.100.0/24 out its directly connected interface, VLAN 100.
Click the add button, and you will see the static route configuration window.
This can be slightly confusing at first. Which interface should you add the default route to? The answer, is that it is quite similar to configuring a static route on a regular IOS device. Remember on a router, the command is ip route <destination network> <destination mask> <gateway IP> OR <forwarding interface>
In this case, the command on the ASA CLI is route <ifname> <destination net> <destination mask> <gateway IP>
So keep this in mind while within the GUI-the interface name is the one by which the traffic will be routed out, following the configured route settings. So in this instance, our default route should be added to the outside interface, as configured below

Make sure to click apply, and then save to your startup config if desired by clicking the Save icon. Now, on to understanding behavior regarding security levels and configuring access rules.
Access Rules and Security Levels
Start by clicking on Firewall under device setup, while still within the configuration pane.

By default, the firewall will use its security levels for stateful filtering.
Any traffic sourced from higher security interfaces is permitted out to lower security interfaces
Reply traffic from lower security interfaces is permitted back to higher security interfaces
Any traffic from lower security -> higher security interfaces is denied implicitly.
Since we assigned the outside interface to security level 0, and the inside interface to security level 100, only traffic initially sourced from the inside to outside, and its associated reply traffic from the outside, will be permitted. What is important to keep in mind, is if we create an access rule, what happens to this filtering behavior in regards to the security levels. If you create an access rule for the inside, say filtering any IRC traffic from exiting, the ACL will add an implicit deny any at the end of the statement. This can cause some confusion as the behavior changes from the above security level rules, to using the ACLs. The stateful reply traffic will remain the same however.
I will use the packet tracer tool to demonstrate this behavior. The packet tracer tool is a very useful feature which can act as a policy review to let you know what types of traffic will be denied or permitted, without having to send actual traffic through the firewall.
Start by configuring your inside incoming ACL to filter any IRC traffic.

Now you will see your access rule icons change from the "any, any less secure networks" to deny any any IRC.

There is an associated global deny any any rule attached onto this ACL-we can confirm that all of the remaining traffic will be denied (probably something we don't want to happen) by using the packet tracer tool. The tool is located under Tools. We'll emulate a user attempting to browse out to their favorite business site, facebook (simulated IP).

As you can see, the traffic would be denied. You can drill down into the Access-List phase and see which rule denied this traffc.

See how it says "Config Implicit Rule". Remember our rule with access lists? There is always a implicit deny rule at the end of every access rule. To correct this, we will need to add a permit any at the end of our inbound filtering statement for the inside interface. Make sure you add the rule after your deny rule-same logic with standard/extended ACLs on IOS systems, the rules are processed in order and processing will end at the first matched statement. Don't forget to click the apply button and save the configuration to running config.
After you do so, lets run the packet tracer rule again.
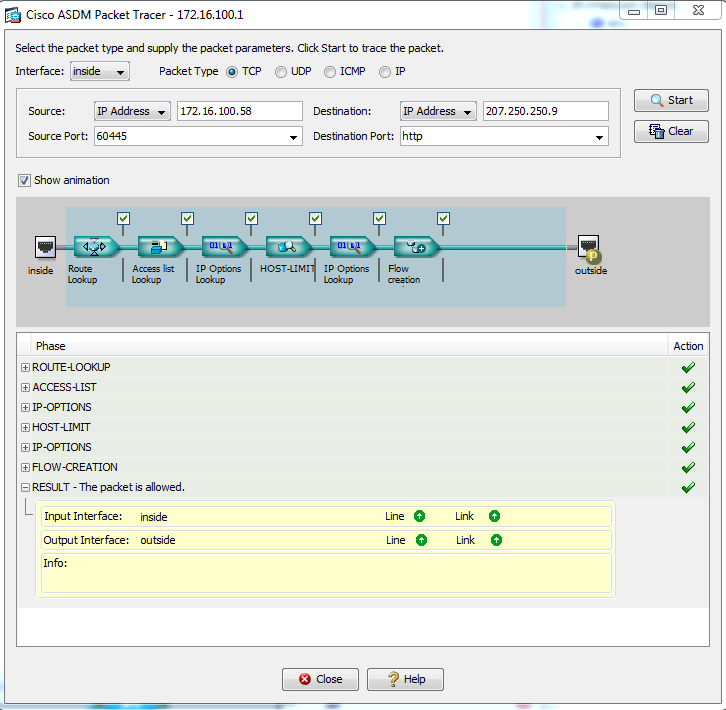
So going out, according to packet tracer, our configuration will work. We still have a problem, however. How will traffic from our facebook browser be returned to that inside address of 172.16.100.58? Since there is no NAT or PAT configured yet, our traffic will likely be filtered out within the ISP to begin with-this is an unroutable, private IP. Lets fix this issue.
Configure NAT/PAT
You can see the nat configuration directly below Access Rules in the pane on the far left. Click on NAT Rules to get started.

Now, to fix our NAT issue. We will click on the add drop down button, and select add NAT rule. We want to configure PAT for our entire 172.16.100.0/24 block of addresses, with PAT overload so all of our inside hosts can have their IPs translated using the ASA's outside interface IP.

We'll set the source interface to inside, the destination interface to outside, the source, destination, and service fields to ANY. Now under the translated packet, we will select source NAT type of Dynamic PAT (hide). To set the source address to translate into, click on the ... button and select the outside interface

Your rule table should look like this

Lets say we wanted to refine these rules abit more, and specify that only hosts from the internal network of 172.16.100.0/24 should be matched to have their addresses translated. To accomplish this, we need to create a network object. To allow for better organization, we should ideally create a network object group, which we can later add more network objects into. We can do this from within the nat rule window. So edit your rule again, and under the source address for the match section, click on the ... button again to draw up your selection. Now you can click on the add drop down, and select network object group.

Lets call this group "INSIDE-HOSTS", with a description of "hosts inside the corporate network". You cannot have spaces in the group name, but you may add spaces in the description. Now from within this window, you can add your network object groups. Click the radio button Create new Network Object member. Set a name if desired, set the type to network, and set the IP address to 172.16.100.0 with a mask of 255.255.255.0. You can also add in a description if desired. Click Add >> when you are finished, and then OK. Your window should look like this

Now, from your Browse Original Source Address window, you can select your INSIDE-HOSTS network object group, or just select the network object of VLAN100. In the real world, this selection would depend on your network design. We will select our newly created network object group of INSIDE-HOSTS.

Click ok, and now your NAT rule will apply to any network object that is a member of INSIDE-HOSTS. In our configuration, that would be any host inside our VLAN 100 network of 172.16.100.0.
Configure ICMP Inspection
Now we just have one last component to configure. Have you noticed that you are unable to ping the neighboring router's address (if you are following the topology) at 207.100.100.30, from your management workstation off the inside interface of the ASA? In fact, any ICMP traffic crossing the ASA, and returning through it will fail.

By default, the ASA won't statefully inspect icmp traffic. This means that any ping attempts crossing the firewall will fail, as there is no stateful inspection, the traffic cannot be returned. For troubleshooting purposes, lets enable this. Below the NAT Rules icon is Service Policy Rules. It is within here that we can get ICMP inspection enabled.

Right click and edit the inspection default policy. This policy is present on the default configuration of the ASA
Now browser over to default inspections. You can see that ICMP is listed, by why isn't working? The answer is within the Rule Actions tab-these are the actions (hence the name) that are applied to traffic that meets the inspection criteria.

Click on the rule actions tab, browse down until you see ICMP-you will see that it is unchecked. Check the box next to ICMP, click ok, and apply the configuration. Now try to ping again from the inside interface to the neighboring router. Your ping should be successful this time.

That completes our ASA configuration for now, later we will return to configure the VPNs!


